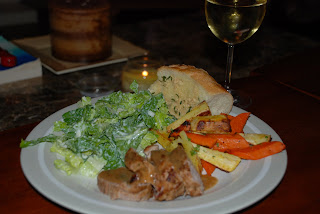
Well, last week I celebrated my 28th birthday! It started a few days early with dinner at Fearing's with Brian, my best friend Lauren and her husband Michael who was also celebrating his 28th birthday. It was a fabulous dinner with lots of wine and great food!
My actual birthday falls on the 23rd of December. I have always loved my birthday and love that it is 2 days before Christmas. The season is filled with holiday spirit and warmth and everyone is excited and ready for the best holiday of the year. This year, I really just wanted to relax and cook a fancy dinner for Brian and me. I decided on filet mignon with bearnaise sauce and a potato and brussel sprout hash with a bottle of Silver Oak.
I seared the filets in a super hot cast iron skillet on all sides then transferred it to the oven to finish cooking, then I began the hash and sauce. I have always heard how wonderful bearnaise sauce is with steak, however Brian and I had a really bad experience with tarragon when we were dating and tried to make a nice dinner of tarragon chicken. The licorice flavor was way too strong. I decided to give tarragon a second chance and the bearnaise sauce was incredible. I am so glad I decided to experiement with it. The flavor paired so perfectly with the steak. I know it is such a classic sauce, and I can't believe I have never had it, and if you haven't either...please do!
Bearnaise Sauce (recipe by Tyler Florence)
1 bunch fresh tarragon
2 shallots, minced
1/4 cup champagne vinegar
1/4 cup dry white wine
3 egg yolks
1 stick butter, melted
salt and freshly ground pepper
Make the bearnaise reduction first. In a small saucepan, combine half of the tarragon, shallots, vinegar and wine over medium-high heat. Bring to a simmer and cook until reduced by half. Remove from heat and set aside to cool.
Blend yolks and bearnaise reduction together in a blender. With the blender running, add 1/3 of the butter in a slow steady stream. Once it emulsifies, turn the blender speed up to high and add the remaining butter. Add the remaining half bunch of fresh tarragon leaves, season with salt and pepper and give it 1 more buzz. Set aside in a warm spot to hold the sauce.
Monday, December 28, 2009
Saturday, December 19, 2009
A Simple Red Sauce
Tonight is the big Christmas celebration with half of our family. Brian and I are spending the evening with my mom, step dad, 2 step sisters, 2 brother-in-laws, 1 step brother, 2 nieces, 1 niece on the way, and a partridge in a pear tree...
We decided to have a casual evening with a laid back comforting meal. We have had the big turkey with all the sides at Thanksgiving, a ham and all the sides at a family Christmas party last weekend with some of our extended family, and there are many more gatherings on the way with this type of feast on the menu. So...I have volunteered to make a homemade lasagna that makes my mouth water just talking about it with some garlic bread on the side. My mom is preparing the salad and my step sisters are making the desserts.
I decided to prepare the sauce this morning because I love to let it simmer for an hour or so to get nice and thick. It will also make my life that much easier later today when I am ready to build my lasagna.
I absolutely love this sauce. I love altering it every time I make it, depending on the dish. I use it with pastas, on pizza, in casseroles, on chicken parmesan, you name it...it is so versatile.
Start by heating about a 1/4 cup of olive oil over medium high heat. I of course use a Dutch Oven for this, but you can use a large sauce pan of your choice.

Then begin chopping a small onion and a couple cloves of garlic.

I add the onion to the oil once it has heated through and saute it a few minutes before adding the garlic. Saute the onion and garlic until they are translucent. About 5 - 10 minutes.

Chop a carrot and a celery stalk while your onions and garlic are cooking. Quick tip: I like to cut slits in the celery and then chop my pieces all at once. I think it is easier because the strips are still being held together by the stalk.

Add the chopped carrots and celery and some salt and pepper to the onion and garlic and saute for about 5 - 10 minutes. Basically until the vegetables are soft and tender.

Next, add 2 28 oz cans of crushed tomatoes, some dried basil, parsley, oregano, and 2 - 3 bay leaves and simmer on low heat for about an hour or so to let the sauce thicken. (Sometimes I add red pepper flakes here for some heat.) I like to use an Italian brand of canned tomatoes, but you may have to experiment with brands. I definitely like some brands better than others.
 Here is the reduced sauce. I like to taste it after it has reduced for seasoning because the flavors have had a chance to concentrate. Today, the tomatoes were still tasting a little acidic, so I added a couple of sprinkles of sugar and a drizzle of honey. I also added a couple tablespoons of butter. Remember that the sauce will sweeten slightly after pureed due to the carrots.
I like to use my immersion blender for pureeing the sauce, but you could use a blender or a food processor and do this in batches. Once pureed, you can use the sauce immediately or store it in the refrigerator. If you are not planning on using all the sauce soon, you can let it completely cool and freeze it in smaller portions.
More to come...lasagna!
Monday, December 14, 2009
Coq Au Vin - I'm Mastering the Art of French Cooking...
This weekend was packed full of holiday parties, which meant lots of cooking and baking...I made a wonderful mac & cheese, some blondies (which we actually got to enjoy this time), Coq Au Vin, Garlic Bread, and some Day and Night Cookies for a party on Tuesday. WOW! My kitchen was in constant use for the few hours I was actually home. I want to focus this post on the Coq Au Vin though. This was my idea for a relaxing and incredible meal to wind down the busy weekend. This is one of my favorite meals to prepare and eat and Brian even said last night that he thinks it is his favorite dish I make. The sauce is rich and velety, the chicken is tender, and the vegetables pop with flavor. This dish is super simple and delicious and it really focuses on the use of layering flavors to result in a truly delectable chicken.
Coq Au Vin (recipe courtesy of Ina Garten)
2 tbls good olive oil
4 ounces good bacon or pancetta, diced
1 (3-4 lb) chicken, cut in 8ths
Kosher salt and freshly ground black pepper
1/2 lb carrots, cut diagonally in 1 inch pieces
1 yellow onion, sliced
1 teaspoon chopped garlic
1/4 cup Cognac or good brandy
1/2 bottle good dry red wine, such as Burgundy
1 cup good chicken stock, preferably homemade
10 fresh thyme sprigs
2 tbls unsalted butter, at room temperature, divided
1 1/2 tbls all-purpose flour
1/2 lb frozen small whole onions
1/2 lb cremini mushrooms, stems removed and thickly sliced
Preheat the oven to 250 degrees F.
Heat the olive oil in a large Dutch oven. Add the bacon and cook over medium heat fo 8-10 minutes, until lightly browned. Remove the bacon to a plate with a slotted spoon.

Meanwhile, lay the chicken out on paper towels and pat dry. Liberally sprinkle the chicken on both sides with salt and pepper. When the bacon is removed, brown the chicken pieces in batches in a single layer for about 5 minutes, turning to brown evenly. Remove the chicken to the plate with the bacon and continue to brown until all the chicken is done. Set aside.

Add the carrots, onions, 2 teaspoons of salt and 1 teaspoon pepper to the pan and cook over medium heat for 10-12 minutes, stirring occasionally, until the onions are lighly browned. Add the garlic and cook for 1 more minute. Add the Cognac and put the bacon, chicken, and any juices that collected on the plate into the pot. Add the wine, chicken stock, and thyme and bring to a simmer. Cover the pot with a tight fitting lid and place in the oven for 30-40 minutes, until the chicken is no longer pink. Remove from the oven and place on top of the stove.
Mash 1 tablespoon of butter and the flour together and stir into the stew. Add the frozen onions. In a medium saute pan, add the remaining 1 tablespoon of butter and cook the mushrooms over medium-low heat for 5-10 minutes, until browned. Add to the stew. Bring the stew to a simmer and cook for another 10 minutes. Season to taste. Serve hot.

Monday, December 7, 2009
Weekend Holiday Baking
 This weekend I decided to make these German Chocolate Cookies from Paula Deen's 2008 Holiday Magazine. I woke up Saturday morning just dying to sqeeze something else into my day, so why not whip up some cookies. I had 30 minutes to spare...and chocolate makes everything better. I had a crazy busy weekend and next weekend will be even crazier. The month of December is definitely one of my favorite months of the year because I love the holiday season and shopping, but I don't know how I (and everyone else) does it. We wake up early and we go go go all day and almost every night is filled with a holiday party or dinner. Exhausting. Anyway, these treats are super simple and super delicious. The recipe states you will get 3 dozen cookies...I did not get near that, but I never do, I must make them too big, but I don't like small cookies.
German Chocolate Cookies (recipe by Paula Deen, 2008 Holiday Baking Magazine)
1/2 cup butter, softened
1/2 cup brown sugar, packed
1/4 cup sugar
1 egg
1 tsp vanilla
1 4oz bar German Sweet Chocolate, melted
1 1/4 cups flour
1/4 cup cocoa powder
1 tsp baking soda
1/4 tsp salt
1 1/2 cups flaked coconut
1 cup chopped pecans
Preheat the ove to 350 degrees. Line baking sheets with parchment paper. In a large bowl, beat butter and sugars with an electric mixer until fluffy. Add egg and vanilla and mix until combined. Add the melted chocolate and stir until combined.
In a seperate bowl, combine flour, cocoa, baking soda, and salt. Gradually add to the butter mixture, beating until combined. Stir in the coconut and pecans. Drop batter by the spoonful on to the cookie sheet.
Bake in oven for 10 - 12 minutes or until cookies are done.
Wednesday, December 2, 2009
Snow Day
I woke up this morning to find it snowing outside! How wonderful. This so rarely happens in Texas, but I so enjoyed seeing all of the white flakes fluttering through the air. I was tempted to call in sick and curl up on the couch with Dutch while drinking a latte and watching the Today Show. That obviously didn't happen and I was off to work, driving with the flurries hitting my windshield. By the time I got to the office, the snow had stopped, but it was a great morning anyway, and cold enough to bust out my long, black, wool coat that I so adore. I was excited to listen to my Josh Groban Christmas CD and wear my new scarf knitted by my mom's dear friend Sharon.
Do you ever make dinner that is a total flop? Last night I made a Turkey Meatloaf that was just not stellar. I guess I should have known it wouldn't be considering I was using ground turkey breast, but I thought since I was using Ina's recipe (and everything of hers is top noch by the way) that it would be successful. I use ground turkey breast all the time to healthify dishes, but I am usually careful and cautious to make sure I keep moisture in. The turkey meatloaf was just kind of bland and dry. I am going to have to turn the leftovers into a sloppy joe cause there is just no hope for it any other way...
Do you ever make dinner that is a total flop? Last night I made a Turkey Meatloaf that was just not stellar. I guess I should have known it wouldn't be considering I was using ground turkey breast, but I thought since I was using Ina's recipe (and everything of hers is top noch by the way) that it would be successful. I use ground turkey breast all the time to healthify dishes, but I am usually careful and cautious to make sure I keep moisture in. The turkey meatloaf was just kind of bland and dry. I am going to have to turn the leftovers into a sloppy joe cause there is just no hope for it any other way...
Wednesday, November 25, 2009
Baking for Turkey Day
I am so ready for Thanksgiving I can hardly stand it. As much as I enjoy being with my family on Thanksgiving, I was really looking forward to waking up this morning and spending the day in my favorite room of the house...my kitchen. I was able bake all of my goodies a day ahead of time so my stuffing can have my full attention tomorrow. I decided to make my pie dough first since I had doubts on how it would turn out. I have only made a homemade pie crust a couple of times and I have not yet been 100% satisfied with the results. Since I made it first, I still had time to recover if I blew it. Yesterday I went shopping for a pastry cutter. Of course I could have used a fork, but I am a serious baker and I need a pastry cutter, right? (Truly, I needed it to rev up my confidence and at least make me feel like I knew what I was doing.)

Here is my beautiful dough all rolled out. Still working on getting it to a perfect circle. Please disregard my overuse of flour...for some reason it looks like way more in the picture than was actually used. I swear I used a lightly dusted surface, it just all squished out to the sides.

I was worried about getting the dough from the counter to inside the dish without tearing or breakage, but I just folded in to a small square and gently folded it out into my dish (inherited from my grandmother by the way). Be patient and it will work perfectly. After all my googling for the perfect pie dough, I ended up using Ina Garten's. It worked out great!

Here I decided to get creative and decorative and use one of my fall cutters from last year (that I just had to have) to cut small flowers around the edge of my pie. Nice touch I think.

I poured my filling into my crust and outlined some pecan halves I had as extra to make it "holiday worthy". I was a little disappointed that the filling did not come all the way to the top of the crust. The recipe said it was for a 9 inch pie plate...I guess that is what I get for testing a new recipe. I used the recipe from the Pie Winner from Martha Stewart's Pie Contest this year. Obviously I used a different dough, and I also left out the toffee bits, but most of the same principles still apply. Time for baking.


Ok. Moving on to the Pumpkin Cake with Maple Cream Cheese Frosting. I was inspired to make this cake by the November/December 2009 Cooking with Paula Deen magazine. By the way, you should totally spend the $4.99 on this one because there are tons of good looking recipes in there. I have all of her magazines this holiday season (and last) and I have found the most potential in this one. I started the batter with my new hand mixer that I also bought yesterday...I have had my other one for 4 years and not that they ever go bad, but mine broke and I use that thing all the time. I have a fancy Kitchen Aid mixer, but sometimes you just need the ease and convenience of the good ole hand version. It was quite a difficult purchase by the way, who knew there were so many options and price ranges. I almost bought an $80 9-speed version until I woke up and realized that I would never need 9 speeds. 5 are fine, thank you, and only $40.

Added the wonderful pumpkin now...and oh how the smell is filling my kitchen. Oh, maybe that was my new Orange Pumpkin candle. Lovely.

Ok, my cake is in the oven...what to do...what to do. Oh, I'll make some sugared cranberries and rosemary that I already have on hand to decorate my cake! No, I unfortunately did not think of this myself...thanks Paula.
 Ok, they are baked and gorgeous. Didn't quite get them on to my cooling rack like I wanted, but it's hard to do without my hubby to help. They do look gorgeous though don't they...
 Here we are...the big Ta-Da. It looks so divine...I can't wait to cut me a slice tomorrow.
Happy Thanksgiving Everyone!
Monday, November 23, 2009
Sunday Night Dinner
With my brain obsessing over Thanksgiving treats, I had the most difficult time deciding what I wanted to make for our Sunday night meal this week. Since the summer, Brian and I have really been treating ourselves to wonderful Sunday dinners that we look forward to it each week (probably due to the nice bottle of wine we have as well). I finally decided on Roasted Pork Tenderloin, Roasted Carrots and Parsnips, Garlic Bread, and a Simple Salad. I bought 2 1lb Pork Tenderloins for roasting, 1 for dinner on Sunday and 1 for dinner on Tuesday. Leftovers will make a great sandwich!
This meal is so easy...I started by prepping my
veggies and then prepping my pork. I put them
in the oven at the same time and while they were roasting, I prepared the bread and the salads. Also, since I seared the tenderloins in the skillet I was left with some wonderful pan drippings that were screaming at me to make a gravy, so I got out some butter, flour, chicken stock and thyme and I whisked it up quickly. Everything was done 25 minutes later and Voila...dinner is served.
Roasted Pork Tenderloin
2 1 lb Pork Tenderloins, trimmed of excess fat and silverskin
Salt, Pepper, Paprika
Canola Oil
1/2 cup Water
I sprinkled Salt, Pepper, and Paprika all over each tenderloin then tied them up with kitchen twine so they would cook evenly. I drizzled some oil in my skillet and seared each side of the tenderloins and set them on a rack for roasting. (Let me just add that I had to sear them seperately because I do not have a large enough skillet to sear them both at the same time...Also, I had to make-shift a roasting pan because I do not own one. I just took a regular baking sheet and put some water in it then set a rack over it for the pork to sit on, this of course would not work for your turkey...but my pork turned out delicious!) I roasted them at 425 degrees for about 20 - 25 minutes, basically until the internal temperature read 150 degrees. (mine read 149...) Then I took them out and LET THEM REST. This is very important...all those juices have to come back together. Do not slice it for 10 - 15 minutes please. It will be wonderfully juicy and slightly pink...just perfect.
Roasted Carrots and Parsnips (recipe inspired by Ina Garten, Back to Basics)
1 lb Carrots, cut diagonally in large pieces
1 lb Parsnips, cut diagonally in large pieces
1 1/2 tbls Olive Oil
1 tsp Kosher Salt
1/2 tsp Freshly Ground Pepper
1 tbls Fresh Parsley, chopped
Begin by peeling the carrots and parsnips and cutting them diagonally in large pieces. Place the cut pieces on a baking sheet and toss with oil, salt, and pepper. Roast on 425 degrees for 20 - 30 minutes, tossing frequently. When they are soft and tender, remove them from the oven and toss with chopped parsely.
Friday, November 20, 2009
Stuffing vs Dressing
It's that time of year again when the scent of sage and poultry seasoning fills the air with a hint of pumpkin pie spice in the background. I love this particular week of the year because I spend so much time researching recipes and thinking of ways to spice up traditional favorites. This year we are spending Thanksgiving Day with my family and I am making the stuffing, cranberry sauce, green beans, and pumpkin pie (and if I get crazy a pecan pie too). I have decided to steer away from my family tradition of dressing this year and make a stuffing to go along side our turkey. I have always been confused on stuffing vs dressing, but I think my definition now is pretty good. I know technically stuffing should be cooked inside the bird, but really that is just setting you up for disaster. Either your turkey is going to be overdone with great stuffing or you are going to have a great turkey with underdone stuffing meaning salmonella may be lurking in there...not good. So, I have moved towards defining the two not by the way they are cooked, but by the ingredients involved and how they are used. To me, stuffing is a little dryer and the bread stays cubed and defined with a little bit of broth for moisture and any other ingredients you desire. Dressing on the other hand is a lot more moist and dense. The bread, whether it be cornbread or biscuits or a combination of both, absorbs a lot of broth and is packed tight with other ingredients. Anyway, Brian grew up on stuffing and I grew up on dressing, so it is a discussion each year as to which is better. Naturally, I vote for dressing and Brian votes for stuffing, but maybe if I make a moist stuffing this year it will be a new tradition in our family, a combination of each of our traditions if you will. More to come once I start cooking next week...I have taken off Wednesday to begin a full day of baking and getting things ready for cooking on Thursday.
Friday, October 30, 2009
Bischoff's in the Bay Area
We are back from Napa and San Francisco! We had such a great time on our much needed vacation and spent time seeing every inch of the city and drinking every sip of wine in the valley. We flew into Oakland to stay with Brian's family for a few days while we toured San Fran. We got some great views of the city and ate at some great restaurants. Here we are at the Golden Gate Bridge! We were too lazy to ride bikes across it, but we were still able to get an amazing picture. Awe...

 Here we are waiting in a very long line to ride the famous cable car. We finally got on the 4th one that came by and paid $5.00 each...Brian was not near as impressed as I was, but he rode it anyway. Thanks babe!
On to Napa!! We did not want to come home...being in Napa was just incredible and I know we could spend forever there if we had too. Great food, great wine, and great company. Luckily we brought enough wine back with us to be able to enjoy Napa in Dallas for quite some time.
 One of the many beautiful views of the Napa Valley. No matter what angle you stand or which way you look you are surrounded by absolute beauty. If only I could wake up to this everyday.
 This was one of the cutest little places to eat. It had such a great deli with all kinds of meats and cheeses. They also sell all kinds of olive oils and vinegars...I loved just looking around. One of my other favorite lunch spots was at the winery V.Sattui. It had the most amazing deli counter with all kinds of sandwich choices as well as prepared pasta salads, potato salads, olives, cheeses, crackers, spreads...the list goes on and on. And their wine wasn't bad either. We knocked out a full bottle during our very first lunch here in Napa. What about dinner you ask? The first night we ate at Market where we had a wonderful dinner and enjoyed some good ole mac and cheese. The next night we went to dinner at Bottega, Michael Chiarello's new restaurant. Where do I begin with this one? AMAZING. We started with bread and a dip consisting of garlic, parmesan, scallions, olive oil, lemon and maybe some other stuff that was delicious. We then moved on to our appetizer of a fried dough ball wrapped in prosciutto and dipped in a sweet wine sauce. Next up, the Rabbit Ragu over pasta followed by Lamb Rib Chops with Figs over polenta. Brian had to roll me back to the hotel. (I am still dreaming of that Rabbit Ragu by the way...it was delightful) And finally, we finished our trip in Napa with dinner at Cindy's Backstreet Kitchen where we brought our own wine and got free corkage. Here we had some of the best Oysters I have ever had and definitely one of the best Caesar salad's I have ever had. I just need to make a little more money so next time we can wine and dine ourselves at the French Laundry where it costs only $250 a person and doesn't include wine, just a glass of champagne. I wonder if I would even be able to appreciate and understand the complexity of the 9 courses? I am willing to try...
 Me at the winery of Brian's favorite Cabernet, Silver Oak. I don't know why it's me and not him in the picture though...I was in a hurry to get to the wine I guess.
 Great view at the top of Sterling. Not award wining wine, but great views.

Here is Brian in the torture chamber sitting on a chair with 100s of iron spikes that are heated internally from a fire beneath. It looks more like he is on his throne.
 Here we are enjoying our final tasting of the week...
We had to stop by the Culinary Art Institute in Napa! I had to see if there were any unique gadgets or gizmos I needed. Didn't find any, but it was still fun. I did learn a lot about the local ingredients and how to better pair my wine with my meal choices at home.
Friday, October 16, 2009
Happy Birthday turns to Business Proposition
This week I was asked to bake a cake for my friend/co-worker's husbands birthday. At first I was flattered, then I was nervous, then excited, then nervous again, and now I am relieved. I love to bake and everytime I do bake I am very pleased with the results, so I don't know why I get so nervous, especially for this one. She asked for a German Chocolate Cake which I am extremely familar with and completely comfortable with. I think it is the whole concept of not being able to taste the end result before someone else dives in. And I also have the memory of one night going in the kitchen to whip up some oatmeal raisen cookies for Brian and me. I just threw stuff together as usual and started dolloping out my cookies. When I was done, there was still a small amout of batter left in the bowl so I snuck a sampling only to gag at my use of salt instead of sugar. Ooops.
Anyway, so this week during my episodes of mixed emotions, I got to imagining myself as a baker. I like the image in my head of me baking away, alternating my cute aprons, and using all my fun pans and colored spatulas. I know that is not reality, but reality has not sunk in yet. The girls at work also encouraged the idea by promising to give me business for birthdays and holidays. What a great job, bake a few cakes a month and bake a ton around the holidays which is when I get the itch to bake the most. There I would be, using my 2 ovens to bake everything from Chess Pie, to Cream Cheese Brownines, to Red Velvet Cake, to Peppermint Scones, to Lemon Pound Cake, to 100 different types of cookies (if you can't tell, my preference is cookies...love them!) with Dutch sitting quietly by my side, licking up anything that falls to the floor. I know...Dream On
Anyway, so this week during my episodes of mixed emotions, I got to imagining myself as a baker. I like the image in my head of me baking away, alternating my cute aprons, and using all my fun pans and colored spatulas. I know that is not reality, but reality has not sunk in yet. The girls at work also encouraged the idea by promising to give me business for birthdays and holidays. What a great job, bake a few cakes a month and bake a ton around the holidays which is when I get the itch to bake the most. There I would be, using my 2 ovens to bake everything from Chess Pie, to Cream Cheese Brownines, to Red Velvet Cake, to Peppermint Scones, to Lemon Pound Cake, to 100 different types of cookies (if you can't tell, my preference is cookies...love them!) with Dutch sitting quietly by my side, licking up anything that falls to the floor. I know...Dream On
Monday, October 12, 2009
I miss my Nana
My apologies once again for it being so long since my last post. Unfortunately, my life has taken a chaotic turn and blogging was pushed off the priority list. I have been traveling quite a bit with work and my grandmother passed away last week who I was extremly close to. I called my grandmother "Nana", and I grew up cooking next to her and baking with pecans from her backyard. Every year we collect all the pecans and have several pounds shelled which we would divvy between us and freeze for use throughout the year and we bushel the rest to sell. My mom and I have been going through her things and I keep collecting box fulls of cookware and bakeware that I just cannot part with. I have adopted several of her cast iron skillets, her glass pie plates, some very unique and old kitchen utensils, and the list goes on and on. Nana taught me so much about cooking and baking. To her it was no challenge...she never measured and hardly ever looked at a recipe. She was famous for her pecan pies, coconut pies, mac and cheese, fried okra, pork chops, pear preserves (made with pears from her pear tree), and sweet pickles. It is so sad to me how her generation is slowly leaving us...it is that generation that possesses the skills to grow their own vegetables, raise their own chickens for eggs, can jelly, can preserves, can pickles, and truly make everything from scrath. I love you Nana, and I will truly miss you!
Saturday, September 26, 2009
Is it un-American to not like American Cheese?
Well, I just got back in town last night, so I apologize for not posting for so long. I was in Orlando. Not too exciting and even less appetizing. I did manage to go to Jimmy Buffet's Margaritaville twice which does have some great food. The volcano nachos loaded up with chili, guacamole, sour cream, cheese, jalapenos, tomatoes, and scallions were a great finish to such a long day. I also tried the crab, shrimp, and mushroom dip which I will have to try to make at home because it was that good (just in case you want more details on that it was jumbo lump crab meat, shrimp and mushrooms simmered in a Cajun cream sauce that was severed with some toasted garlic bread.) Awesome.
Considering the two wonderful appetizers we had had and knowing that the "bar food" was pretty great here, I thought for sure my choice for the "Cheeseburger in Paradise" was going to be spot on. I mean that is one of the most famous songs my Jimmy Buffet, it would almost be a sin not to get the burger right. I got my burger, ordered cooked medium of course, and I cut into it to see that it had indeed been cooked to just medium. Great, I am about to go to Paradise with my burger. I had barely glanced over the description of the burger, but I did notice it stated American cheese. I have never been American Cheese's number one fan or even a fan at all really because there are just too many better choices out there. Why use a processed cheese EVER when there are infinite natural cheeses to choose from? I kinda ignored my intuition to ask for a different cheese because I thought for sure they know what they are doing by putting American Cheese on this famous burger. My first bite was so disappointing. That fake American Cheese flavor really stood out. I don't consider myself to be extremely picky or particular, but a natural Colby or Cheddar would have upped the burger into greatness. Unfortunately, just because of the cheese it wasn't very good, but the onion rings...now those helped make it all ok.
So, is it un-American not to like American Cheese? I don't like it, my husband can't stand it, so why do people even use it. The cost of a burger is cheap enough for me to use a different cheese. You will never catch me putting American Cheese on a burger, in my grilled cheese or in my Mac and Cheese, so you shouldn't either, unless of course you like that unnatural flavor...to each his own I guess. I will make the exception for Velveeta used for queso, I manage to like that just fine.
Sunday, September 13, 2009
Rain, Rain...Not Going Away
Today I woke up and I was ready for fall. For the past few weeks I have been anxiously awaiting a drop in temperature, but not quite ready to let go of summer. There is just something about summer that is freeing, the days are longer and for me there seems to be a little more free time. This morning however, I was ready for a change. I think all the rain this weekend made me feel all cozy and lazy and ready for fall. I am ready to begin a new season of cooking and baking. I am ready to slow cook a stew or chili all day to serve with some warm cornbread from my cast iron skillet. I am ready to bake fall pies, cookies, and cakes that will fill my kitchen with the smell of cinnamon. I am ready to sit out on the patio with a glass of wine and not sweat to death. I am ready to wake up to early morning daylight for my morning runs, (but today I slept in until around 11am and didn't even get out of my pajamas until around 4pm, oh well). I am ready to tailgate every Saturday of SMU home football games. I am ready to watch football with Brian every night of the week... (Well, not really quite ready for that yet, but I am working on it.) If only I had overcome the lazy bug and armed myself with some hearty ingredients this weekend, we could have sat down to a classic Sunday comfort meal to watch football and listen to the rain. That didn't happen because I was way too lazy and didn't make it to the grocery store. I am leaving town on Wednesday and will be gone for 10 days, so I did not feel the need to stock up on groceries, however I was able to whip up a comforting stroganoff that I made with ground turkey to lighten it up and that really hit the spot. (No, I don't mean the kind from the box...GROSS!) By the way, I made just enough to serve the 2 of us, but feel free to double this if you want to make enough for 4 servings.
Turkey Stroganoff Kasey's way (2 Servings)
Ingredients
1/2 lb egg noodles
1 Tbls unsalted butter
1/2 lb ground extra lean turkey
1 tsp garlic, minced
1 cup chicken stock
1 1/2 tbls ketchup
1 tsp salt
freshly ground pepper, to taste
1/2 onion, finely diced
3 oz mushrooms, sliced (you can use either white button mushrooms or baby bellas)
2 tbls flour
4 oz sour cream
shredded cheddar cheese for topping
Directions
Bring large pot of water to a boil. Add some salt to the water and toss in egg noodles. Cook until noodles are al dente.
Melt butter in non-stick skillet until melted. Add turkey and break up with a wooded spoon. Cook until the turkey is browned and cooked through. Add garlic, 3/4 cup of chicken stock, ketchup, salt, pepper and onion. Bring mixture to a boil, then reduce heat to low and cook covered for about 8-10 minutes. Add mushrooms and cook another 5 minutes or so. Whisk flour into remaining 1/4 cup of chicken stock and add to skillet. Bring to boil, then reduce heat to low and stir until sauce has thickened. Gently stir in sour cream. Add egg noodles and toss to coat them completely with the sauce. Serve hot and top with a sprinkle of cheddar cheese.
Monday, September 7, 2009
Blondies...the non-traditional brownie
The goal for making blondies this week was to take them to the taligate on Saturday to kick-off football season. Well, to kick-off the first SMU game really... So, I planned ahead and made a special batch on Friday cause I knew the morning would get away from me on Saturday since my husband requires a good 6 hour tailgate. Blondies, beer, fajitas, and Texas heat for 6 hours, it was going to be a great day. Well, unfortunately the blondies didn't quite make it. Just as Brian was lifting my dessert travel carrier, I remembered that not all of the handles were completely locked. (That's because I kept sneaking samples just to make sure they were edible.) Yep, you guessed it, all my beautiful blondies landed on the kitchen floor. I was so sad, but about 6 were saved because they didn't hit the floor. The rest...trash.

Blondies (makes about 36 squares)
Ingredients
Pam for baking
1 1/2 sticks unsalted butter
1 1/2 cups all-purpose flour
1 tsp baking powder
1/2 tsp salt
3/4 cup dark brown sugar
3/4 cup light brown sugar
2 large eggs
1 1/2 tsp vanilla extract
1/2 cup toasted pecans
1/2 cup milk chocolate chips
1/2 cup white chocolate chips
1/4 cup toffee chips
Milk (for serving)
Directions
Preheat oven to 350 degrees F. Spray 13x9 baking dish with Pam spray.
Whisk together the flour, baking powder and salt in a small bowl.
Melt the butter in a saucepan. Add both types of brown sugar and whisk until fully incorporated and sugar is melted. Transfer the mixture to a medium bowl and let cool slightly. Whisk in the eggs and vanilla extract. Gradually add the flour mixture and whisk until combined. Fold in the chocolate, white chocolate, toffee and pecans. Pour the mixture into your prepared baking dish.
Bake for about 25 minutes. (The top will crack slightly). Let baking dish cool on a wire rack. Once cooled, cut the blondies into small squares for serving. (Serve with milk!)
Sunday, August 30, 2009
Build a Better Burger
I think I just ate the best homemade burger I have ever had. I love to make burgers at home, eat them at friends houses, eat them at family's houses, anywhere really, but usually they are just that...burgers at home that taste generically homemade. You know what I mean, the ground beef topped with cheddar cheese with mayo and mustard, lettuce, tomato, onion, and maybe pickles if you're lucky. I have tried to fancy up the "at home burger" with different spreads and cheeses, however they never turn out quite like the greasy, juicy, and unique burgers I love from dives, or my favorite restaurants. Tonight, I think Brian and I designed a burger that will be added to the menu of my imaginary restaurant. Yep, I dream of what my restaurant would be like all the time and what delicious dishes I would serve. It varies all the time, quite drastically, but that is the beauty of it all being made up in my head. Anyway, back to the burger. Today at Central Market (after enjoying a fish taco from "The Grill" outside) I purchased some more Hatch green chiles and other veggies for my soon to be famous Hatch Chile Salsa. I also got some of Central Market's freshly made hamburger buns and 90% lean ground beef. I usually don't purchase ground beef leaner than 85% for a burger, but today the 90% lean was on sale for $2.49 per lb, so I went with that. Ok, so you know the drill for the salsa so I won't bore you with that, but are you curious what else made this burger so distinctively awesome? Goat Cheese...yep, believe it! Creamy, tangy goodness that was covered in sweet caramelized onions that complemented the smokey, spicy salsa that dressed our medium rare salt and peppered patties that sat between a freshly toasted bun. Are you drooling yet? It was awesome...
Sunday, August 23, 2009
Delicious Hatch Chile Salsa...
Ok. So the enchiladas turned out delicious, however they were more the consistency of a casserole. The corn tortillas got a little mushy. I am definitely going to have to do some more research in order to perfect the texture of future enchiladas. I do want to supply you with the Hatch chile salsa recipe though because it was terrific! First, I thought a brief description might be in order for these tremendous Hatch chiles just in case you aren't familiar with this extreme goodness. Hatch is a village in New Mexico that is known as the "Chile Capital of the World". They produce this famous green chile that is harvested once a year and used in all types of delicious dishes. You cannot duplicate this flavor with any other type of chile...I will be stocking up on these peppers next week, roasting and freezing them for the big chili cook-off we have every fall during football season. Watch out...I am here to win this season.
Hatch Chile Salsa Verde (Straight from the Bischoff's)
Ingredients
- 1 pound tomatillos, husked
- 1 white onion, sliced thin
- 2 tbls olive oil, seperated
- 4 garlic cloves, (roast one whole head)
- 2 Hatch Chiles, roasted and seeded
- lime juice, to taste (about 1/4 lime)
- 1 teaspoon ground cumin
- Kosher salt, to taste
Directions
Preheat oven to 400 degrees F
Cut the top off of a small head of garlic and place on a sheet of aluminum foil. Pour 1 tbls olive oil over exposed head of garlic and sprinkle with salt. Fold the foil into a pouch like shape and place in the oven. Roast the garlic in the oven for about 45 minutes at 400 degrees F until the cloves are soft and golden brown. You can remove the cloves by either squeezing the skin or piercing each clove with a fork. Meanwhile, on a grill, roast tomatillos and hatch chiles until skin is black and charred all over. Immediately place in a plastic bag for about 3 minutes. Remove the tomatillos and hatch chiles and begin removing the charred skin and seeds. Meanwhile, heat the oil in a saute pan and caramelize the onion over medium heat. Transfer all vegetables and any juices to a food processor. Add the cumin, lime, and salt to taste. Pulse mixture until well combined but still chunky.
Hatch Chiles...YUM
I just ate my way through Central Market. That has to be the best grocery store ever created. I am so unbelievably happy and full when I leave that incredible store. Earlier this summer Brian and I discovered "The Grill" at Central Market. I don't know if it is only on the weekends, but they set up a grill out by the Cafe and serve up hot dogs, hamburgers, cheeseburgers, mahi mahi tacos (this is what I always get...they are so ridiculously good), brats, and sausage. Today they were having the Hatch Chile Festival so the cheeseburger Brian got had a roasted Hatch chile and caramelized onions nestled on top of the patty. I had my traditional mahi mahi taco in one of their homemade four tortillas with coleslaw and remoulade sauce. (p.s. I have tried to re-create this perfect taco, but have been unsuccessful...try try try again.) Bonus...our lunch today totaled $9.00 for the 2 of us...beat that! (Don't worry if you missed the big evet this weekend, so do yourself a favor and schedule your lunch at the grill next weekend and stock up on some Hatch chiles right after.) Anyway, I love chiles and spicy foods, so I happily made my way through the store sampling everything they had to offer from Hatch crab cakes to Hatch flour tortillas to Hatch pesto and even Hatch baked brie. If heat is not your thing...the chiles come in mild or hot so you can choose whichever you like. Tonight we are making Hatch chile enchiladas! I'll be roasting up some tomatillos, garlic, onion and of course...Hatch chiles for a salsa to go over the enchiladas. We've decided to have beef enchiladas, but chicken would be great too. I'll post the recipe later...gotta make sure it's delicious first...
Monday, August 17, 2009
Celebration Dinner
The one tradition we have so far is the dessert we share on our anniversary. When we got married, we decided to have a traditional wedding cake on all the layers except the top tier. That was ours to do whatever we wanted, so we decided to make it carrot cake. Brian and I absolutely love carrot cake and it was so delightful to cut into that comforting orange cake on our wedding day to shove in each others mouth. (I know, I know. You aren't supposed to cut into the top tier until your 1st anniversary, but have you met me? Not always so traditional. Don't worry, my mom was still able to save and freeze our top tier for us to enjoy the next year.) After we chose the carrot cake for our wedding, I had the idea that we would enjoy that cake every year on our anniversary, and so far so good, we aren't sick of it yet. So...I have been on the hunt for a great carrot cake recipe. Last year, I made one from Emeril which I decided to stick with again this year. The cake is super moist and the icing is a delicious classic buttercream with toasted pecans. Usually I am blessed to get to use my Nana's (that's my grandmother) East Texas Pecans. She has a huge pecan tree in her backyard that my mom and I help harvest every year and sell several pecans by the pound, but we also have a lot shelled and keep for ourselves. This is for the benefit of my Nana's famous pecan pie and for me to use in all of my own baking concoctions. I won't go on and on about how wonderful the carrot cake is, but it looks great don't you think?

Gigi's Carrot Cake
Recipe Courtesy of Emeril Lagasse
Ingredients for cake
1 tablespoon butter (I use Pam for baking)
3 sticks, unsalted butter
2 cups granulated sugar
2 cups all-purpose flour
2 teaspoons baking soda
2 teaspoons ground cinnamon
1 teaspoon salt
4 large eggs
1 teaspoon pure vanilla extract
3 cups freshly grated carrots
1 cup, chopped toasted pecans
Ingredients for icing
(I iced my cake differently for elegance, but feel free to use the idea below for a more homemade rustic look)
8 ounces cream cheese
1 stick unsalted butter
1 (1 pound) box confectioners' sugar
1 teaspoon pure vanilla extract
1 cup, chopped toasted pecans
Directions
Preheat the oven to 350 degrees F.
Butter 3 (9-inch) cake pans with 1 tablespoon of the butter and set aside. In a large bowl, cream the butter with an electric mixer. Add the sugar, and beat. In a medium bowl or on a piece of parchment, combine the flour, baking soda, cinnamon, and salt, and mix well.
Add the dry ingredients, alternating with the eggs, beating well after the addition of each. Add the vanilla extract and mix. Add the carrots and beat on medium speed until well incorporated, about 2 minutes. Fold in the nuts. Divide between the 3 cake pans and bake until set and a cake tester inserted into the middle comes out clean, 25 to 30 minutes. Remove from the oven and let rest in the cake pans for 10 minutes. Invert onto wire racks, remove from the pans, and let cool.For the Frosting: In a large bowl, cream together the cream cheese and butter until light and fluffy. Add the sugar gradually, beating constantly. Add the vanilla and pecans.When the cake is cool, place 1 cake layer on a cake plate or stand. Spread the top with cream cheese frosting and top with a second and third cake layer, spreading the icing between each layer. Spread the icing around the sides of the cake and let harden slightly before serving. To serve, cut into wedges.
Friday, August 14, 2009
Sandwiches are underestimated
I am a sandwich lover. I have enjoyed sandwiches my whole life. I love them because they are always satisfying when you are hungry and they can be as easy or as complex as you want them to be. I grew up eating Subway as my mom rarely cooked. I still go to Subway every now and then trying to re-create my perfect sandwich, but their bread just doesn't seem so freshly baked anymore and I wish they would slice the meat fresh. Growing up, I loved Subway because of all the toppings (including my favorite one of all - black olives, which most deli's don't carry these days). My new love for a great deli sandwich is the Great Outdoors. Luckily, there is one right by my office, so every now and then I will pick that up for dinner when I end up working late. With all that said, I appreciate a well made sandwich. So last night for dinner, I created a Club Sandwich for us to enjoy. I used a delicious homemade spicy mayo, but I am saving the art of homemade mayo, aioli and remoulade for another day. I think sandwiches are a perfect canvas to coat with tons of fresh veggies, homemade spreads, gourmet meats and fine cheeses, although sometimes the best ones are the simplest. The biggest mistake I find that people make with homemade sandwiches is in the assembly. Do not underestimate the importance of the layers people. It is crucial in order to prevent your sandwich from being soggy and to ensure your textures and flavors are working together. I listed the recipe of what we had last night, but please don't stop here...try adding avocado, black olives, pickles, any spread you like, different cheeses...I could go on all day, but I have to go fix lunch.
Club Sandwiches (makes 2 sandwiches)
Ingredients
6 slices fresh sourdough bread
Softened butter
6 slices smoked turkey breast, thinly sliced
6 slices honey ham, thinly sliced
2 slices swiss cheese
2 slices medium cheddar cheese
2 tbls mayo (I used a spicy homemade mayo, but use whatever you love)
2 tbls mustard
4 slices fresh tomato
2 small handfuls of shredded lettuce
5-6 slices bacon, cooked and drained
Directions
I started off with 6 slices of fresh Sourdough bread and toasted 2 in the oven (this would be the center slice to each sandwich). I then spread one side of each of the remaining 4 slices with butter and placed in a non-stick skillet to brown up the buttered side. Next, I cooked about 5 slices of thick cut bacon until crispy and drained off the fat. With the 4 slices of bread from the skillet, I spread about a tablespoon of the spicy mayo on 2 of them and spread the remaining 2 with mustard. Now you are ready for assembly...pay close attention. On the 2 slices with mayo, next add a little bit of lettuce on top of the mayo, followed by 2 slices of tomato, a slice of swiss cheese and 3 thin slices of honey ham. Now add the toasted center piece of sourdough bread followed by some crispy bacon, 3 thin slices of turkey and a slice of cheddar cheese. Add the remaining slice of sourdough with the mustard on top of the slice of cheddar. I of course cut each sandwich into the classic 4 triangles. I just served this with some super sweet pineapple we got at the Farmer's Market on Sunday. Enjoy!
Sunday, August 9, 2009
Weekend Cooking
What did you cook this weekend? My list includes, deep dish pizza (inspired by my trip to Chicago of course, I have been talking about it so much, Brian insisted we make some, so...we did), homemade mayo, mahi mahi tacos, and remoulade sauce for the tacos. I should first start out by saying that I was only going to be fully dedicated to making all of these items if Brian was planning to assist, and he was totally on board. Saturday morning we got up and went to breakfast at a wonderful new restaurant by our house, Zinsky's. It's off Preston and Royal, so if you are in the area, check it out. Wonderful breakfast, lunch, and dinner options made fresh. So then we wandered over to Molto Formaggio to get the perfect cheeses for our pizza. We had several samples of exceptional cheese and decided to go with Buffalo Mozzarella (next time for deep dish we will use shredded mozzarella), Pecorino Locatelli, and Trugole. I did not list these cheeses in the recipe below, but they were great alternatives to the basic cheeses normally used on pizza. Next stops, the Farmer's Market and then Central Market. (I had to knock it all out in one swoop or I would loose Brian). When we got home, we had to start making the dough. I was using a new recipe for pizza dough, and as we were combining everything I could tell something was off. The dough was way too sticky. We added some flour, but I just wasn't confident with it. I set it aside in a bowl just in case it decided to rise and we started over. The dough is such a huge part of a pizza that we could not afford for it to be off. Round 2, we began with a trusted recipe which I have listed below. This dough is not near as flaky as the one I had in Chicago, but it is a great dough for a basic homemade pizza, very soft center but gets crispy around the edges. Next, I began the sauce. I bought 2 lbs of fresh tomatoes from the Farmer's Market because Brian and I wanted to try a really fresh sauce. I have always just bought canned tomatoes (San Marzano whenever I can find them) for my homemade tomato sauces, but the fresh were absolutely wonderful! I was slightly concerned that we should have purchased Roma Tomatoes, but I had tasted these regular round tomatoes from one of the vendors and thought how perfect they would be in the sauce. I started boiling some water and got an ice bath ready for the tomatoes. I scored each one so they would peel a little bit easier and plopped them into the boiling water. Each one only needs about 30 seconds in the boiling water, then out they come and directly into the ice bath they go. Once they are cool enough to touch, peel the skin off and cut each tomato in half and remove all the seeds. The rest of the sauce recipe is below and feel free to substitute the fresh tomatoes with a 28 oz can. Brian spent the last part of the afternoon chopping all the veggies for our toppings. Once our dough had proofed, we were ready for roll out and begin the assembly. We were planning on making one pizza in our cast iron skillet, but we ended up with some extra dough, so I created another pizza in an 8 inch round cake pan. We still had leftover scraps so you could probably get about 2 10-12 inch pizzas out of it. We made the main pizza with Italian Sausage, mushrooms, fresh tomato, green pepper, onion, black olives, and basil. On the second one we added spinach, but didn't have any sausage because we had used it all on the other. Pizza toppings are endless and you can make the most unique and wonderful combinations. We didn't reach too far out of the box with ours, but next time, I might. We finally got the pizzas in the oven and counted down all 40 minutes waiting to sink our teeth through the warm veggies, through the gooey cheese and through the crispy crust of our homemade pizza. The wine helped pass the time. When the pizzas came out of the oven, the aroma spilled into the the entire house and we both started drooling. They looked amazing. They tasted even more amazing. I was even able to recover the first dough...so I wrapped it loosely several times in seran wrap and put in in a freezer ziplock bag and stuck in in the freezer so that we can have another Deep Dish Pizza Party soon.

Pizza Dough
Ingredients
1 1/2 cups warm water
1 package of active dry yeast
1 tbls honey
3 1/2 cups bread flour
2 tbls olive oil
2 tsp kosher salt
corn meal
Directions
In a bowl, mix together the warm water, yeast and honey. Whisk slightly. Let sit for about 5 - 10 minutes until yeast has dissolved.
In a bowl, mix together the warm water, yeast and honey. Whisk slightly. Let sit for about 5 - 10 minutes until yeast has dissolved.
Next attach the mixing paddle to your mixer (Kitchen Aid if you have one). Pour in flour, olive oil and salt. Add the yeast mixture and mix on low for about one minute. Remove the paddle and attach the dough hook. With the dough hook attached, put the mixer on low to medium for about 10 minutes. It might not take this long, but the dough should be very smooth and elastic.
Place the ball of dough in a bowl that you have lightly coated with olive oil. Turn the dough in the oil so that it is fully coated. Place plastic wrap around top of dough in the bowl. Place the dough in a warm place about 1 to 2 hours. The dough should double in size.
When you are ready to assemble your pizza, divide your dough into 2 even sections. With a rolling pin, roll out each ball of dough slightly bigger than each of your pans. Sprinkle corn meal on one side of the rolled out dough and place on top of one of the pans. Gently lift one of the sides to allow the dough to reach the bottom of the pan while also pressing the dough into the sides of the pan. There should not be any air bubbles in the dough or any space between the pan and the dough. The dough should come up about 2 inches to the sides of the pan.
Pizza Sauce
Ingredients
2 tbls olive oil
1/2 onion, finely chopped (I used yellow)
1 carrot, finely chopped
1 stalk of celery, finely chopped
1 tbls chopped fresh parsley
2 cloves garlic, minced
2 tbls chopped fresh basil
1 tbls chopped fresh oregano
2 bay leaves
2 lbs fresh tomatoes, peeled, seeded, and chopped
2 tsp tomato paste
Salt and freshly ground pepper to taste
Directions
Heat oil in a large skillet and add onion, carrot, celery, and parsley. Stir to coat. Turn heat to low and cover skillet. Let cook for about 15 minutes until the vegetables are extremely soft and tender.
Remove the lid and turn up heat to medium. Add the minced garlic and let cook until slightly fragrant, about 30 seconds. Add the tomatoes, tomato paste, basil, oregano, bay leaves, and season with salt and pepper. Reduce the heat to low, and let simmer for about 15 minutes until the sauce has thickened.
When sauce has finished cooking, place the mixture in a blender or food processor and process until everything is combined. There should be no large chunks of carrot or celery, but do not over process.
Pizza
(dough and sauce are enough for about 2 pizzas, the other toppings are estimated per pizza)
Ingredients
Dough assembled in pans, see above
2 1/2 cups pizza sauce, divided, see above
2 cups shredded mozzarella
(we used buffalo mozzarella instead, but will use shredded next time)
1/2 cup Romano
1/2 cup Parmesan
2 - 3 links Italian sausage
1/2 onion, chopped
1/2 green bell pepper, chopped
Handful black olives, chopped
1/2 cup white button mushrooms, sliced and cooked down to release juices
1/2 cup spinach, chopped
tomato, sliced thin
2 tbls basil
Preheat oven to 425 Degrees F.
Begin by placing a layer of mozzarella cheese on the bottom of the crust. Add the tomato sauce and toppings of your choice. Add remaining cheeses and place in the oven for about 30 - 40 minutes until golden and crispy.
Serve immediately.
Subscribe to:
Posts (Atom)